
You have no items in your shopping cart.

To measure for a custom frameless shower door, measure the finished opening at the bottom, middle, and top, record the intended glass height, and check the walls for plumb and the threshold for level. Your opening measurements are not the final glass dimensions: the enclosure fabricator must account for hinges, seals, operating clearances, and any wall or curb irregularities before making the glass.
A frameless enclosure needs more information than a width and height. The glass must fit the finished surfaces, the hardware must attach to suitable support, and the door must move without striking bathroom fixtures.
For a 2026 remodel, separate planning measurements from fabrication measurements. Showerdoor manufactures and installs custom framed and frameless glass shower enclosures; the final enclosure layout needs to match the actual bathroom, not just its drawings.
Measure the opening as it exists. Leave glass sizing and hardware deductions to the fabricator. That distinction prevents a useful planning sketch from becoming an incorrect manufacturing instruction.
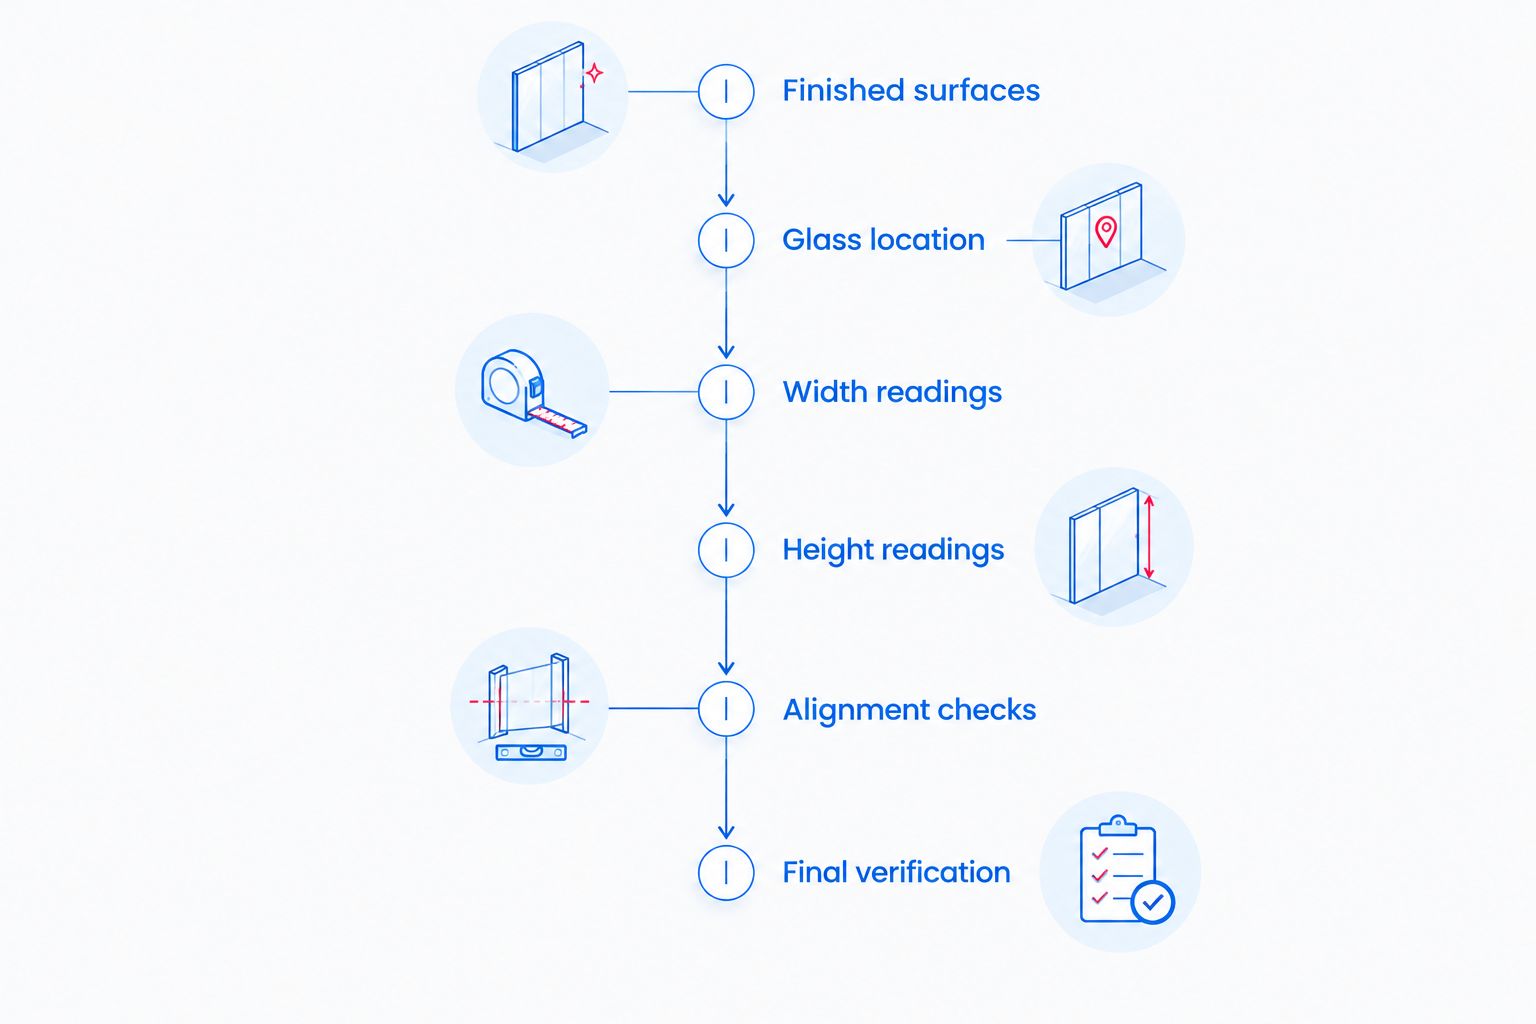
Start with completed surfaces and a clearly marked glass location. Use a tape measure, a level, a pencil, and a sketch or measurement sheet; keep photographs alongside the written dimensions.
The following steps explain how to measure for a frameless shower door without confusing the opening size with the glass size. They are a preparation checklist, not instructions to fabricate or install glass yourself.
Measure between the surfaces the enclosure will actually meet. That means finished tile or other finished wall material, plus the completed curb or shower floor—not exposed framing, backer board, or an unfinished threshold.
Record whether any tile, trim, or curb work remains. If those surfaces change, take new measurements before the glass is ordered.
For a 2026 project with separate tile and glass contractors, agree on the measurement handoff before work starts. The tile installation to shower door fit workflow provides a related planning guide.
Identify where the glass will sit on the threshold and where it will meet each wall. Measure along that intended glass line rather than at whichever edge of the opening is easiest to reach.
This matters when the curb is wider than the glass or the wall has uneven tile. Measurements taken at different front-to-back positions describe different openings, even when they appear to represent the same width.
On your sketch, mark the shower interior, bathroom side, hinge side, and proposed door position. Consistent labels make photographs and dimensions easier to interpret.
Measure the finished opening at the bottom, middle, and intended top of the enclosure. Keep the tape straight across the opening rather than running it diagonally between surfaces.
Record all 3 width readings separately. Do not average them, and do not discard the largest reading simply because the smallest seems safer.
Different readings reveal how the opening changes with height. The fabricator needs that pattern to determine the appropriate glass shape and clearances; the smallest width alone does not describe a custom enclosure.
Mark the proposed top of the glass, then record 2 height readings: one at the left side and one at the right side. Identify the finished surface used as the starting point for each measurement.
A sloped or uneven threshold can make the side heights differ. Write down that difference rather than trying to hide it with an average.
Keep intended enclosure height separate from ceiling height. For a steam enclosure or a ceiling-height design, the top boundary also needs to be documented and reviewed as part of that specific layout.
Place a level against each wall at the intended glass contact line. Note whether the wall leans toward or away from the opening, and record the deviation at clearly identified positions.
Check the threshold along its length and across its depth. Those checks describe different conditions: side-to-side level affects the enclosure fit, while the cross-threshold slope affects where water travels.
Do not assume that a bubble reading alone provides enough information. Give the fabricator the direction and location of the irregularity, supported by measurements and photographs.
Mark the proposed hinge location and the path of the door as it opens. Include the handle in that clearance check, not just the glass edge.
Record nearby toilets, vanities, towel bars, shower controls, and projecting tile trim. A door that fits the opening still needs space to operate and a usable entry path.
For a sliding layout, document the full enclosure width and proposed moving-panel arrangement instead of a swing arc. Ask the installer to confirm the resulting entry opening before approving the design.
Use 1 measurement unit throughout the record: inches or millimeters. Label every dimension and keep fractions or decimals consistent so the fabricator does not have to interpret mixed notation.
Send the sketch, photographs, width readings, height readings, and alignment notes together. Identify unfinished work and any uncertain mounting conditions.
Do not subtract a generic hinge gap, seal allowance, or bottom clearance. The selected hardware and enclosure design determine those details, and the fabricator must confirm the final glass dimensions.
The same finished-surface rule applies to every layout, but the measurement record changes with the glass arrangement. Choose a layout around the bathroom's entry space and mounting conditions, not just the appearance of the door.
| Layout | Best for | What to document | Practical advantage | Constraint to check |
|---|---|---|---|---|
| Single hinged door | An opening served by one swinging door | Opening widths, height, hinge wall, swing path | A straightforward layout to sketch | The glass and handle need swing clearance |
| Door with fixed panel | An opening divided between an entry door and stationary glass | Overall opening, panel division, door position, support locations | Separates the entry from the fixed enclosure area | Panel joints and hardware add sizing details |
| Sliding enclosure | A bathroom where a swing path conflicts with fixtures | Full width, height, support locations, moving-panel arrangement | Avoids a conventional door swing into the room | Overlap and hardware affect the usable entry |
| Corner enclosure | A shower with glass on adjoining sides | Each side, corner relationship, door position, threshold geometry | Encloses a corner shower layout | Angles and panel relationships require additional verification |
None of these layouts removes the need for final measurements. In a 2026 renovation, confirm the enclosure arrangement before approving glass fabrication, especially when a fixed panel or corner changes the door position.
For a corner enclosure, photograph the entire threshold from above as well as each wall. A collection of straight-line widths does not fully describe how adjoining glass panels meet.
Two openings with the same overall width can require different glass dimensions. The difference comes from the finished geometry and the chosen installation details.
These factors belong in the design review, not in a homeowner's guessed deduction. Keep the original measurements intact so the installer can distinguish the opening conditions from the proposed solution.
Send a measurement record that another person can understand without standing beside you. Label the viewpoint on every sketch: looking into the shower from the bathroom is a useful consistent convention.
Your 2026 measurement packet should include:
A photograph supports a measurement; it does not replace one. Likewise, a finished tile surface does not reveal what is behind it, so have the installer confirm the mounting conditions before drilling.
Showerdoor is best for homeowners in California, Arizona, and Nevada seeking custom shower enclosure manufacturing and installation. Its service scope fits a made-to-measure project, but homeowners still need the enclosure design and final site dimensions confirmed rather than relying on a preliminary sketch.
Keep all 3 width readings rather than using only the smallest. A custom fabricator needs to understand the opening's shape, including whether the walls converge, diverge, or change unevenly.
Instructions for a specific prefabricated enclosure can use a different measurement method. Follow that enclosure's instructions rather than applying them to custom glass.
You can take preliminary measurements before tile installation for layout planning, but final fabrication measurements must reflect the finished surfaces. Tile, trim, and curb finishes change where the glass meets the shower.
If you are coordinating a 2026 remodel, mark early dimensions as preliminary. Replace them with verified finished-opening dimensions before approving fabrication.
Do not subtract a guessed allowance for hinges or seals. Record the opening as measured and let the fabricator determine the clearances required by the selected hardware and layout.
This also applies to the bottom gap. The door, sweep, threshold, and operating clearance need to work together; no universal deduction replaces that design check.
What's the first step in measuring for a frameless shower door?
The first step is confirming that the wall and threshold surfaces are finished. Then mark the intended glass location so every measurement describes the same opening.
How many width measurements should I take?
Take 3 width readings: bottom, middle, and intended top of the enclosure. Keep each reading separately so the fabricator can see how the opening changes with height.
Is the shower opening width the same as the glass width?
The shower opening width is not the final glass width. Hardware, seals, operating clearances, and the enclosure layout determine the dimensions used for fabrication.
Can a frameless shower door fit walls that aren't perfectly straight?
A wall that is not plumb needs to be assessed before the glass is sized. Record its direction and deviation, then have the fabricator determine the appropriate glass shape and installation approach.
Should I measure the old shower door or the opening?
Measure the finished opening for a new custom enclosure. An old door does not establish the dimensions for a different hardware system or glass arrangement.
Can I order custom shower glass from my own measurements?
Have the fabricator confirm the dimensions that will be used to make the glass. Homeowner measurements are useful for planning, but they do not establish every hardware clearance or mounting condition.
Does Showerdoor serve homeowners outside California?
Showerdoor manufactures and installs custom shower enclosures for homeowners in California, Arizona, and Nevada. Confirm the project location and enclosure requirements when discussing the installation.
The handle can hit a vanity even when the glass clears it. Before approving your 2026 enclosure layout, include both the handle projection and the glass edge in the door-clearance review.
Ask for the final glass dimensions, hardware arrangement, and opening direction to be confirmed together. Checking those details as one design is more useful than approving a width and height in isolation.


